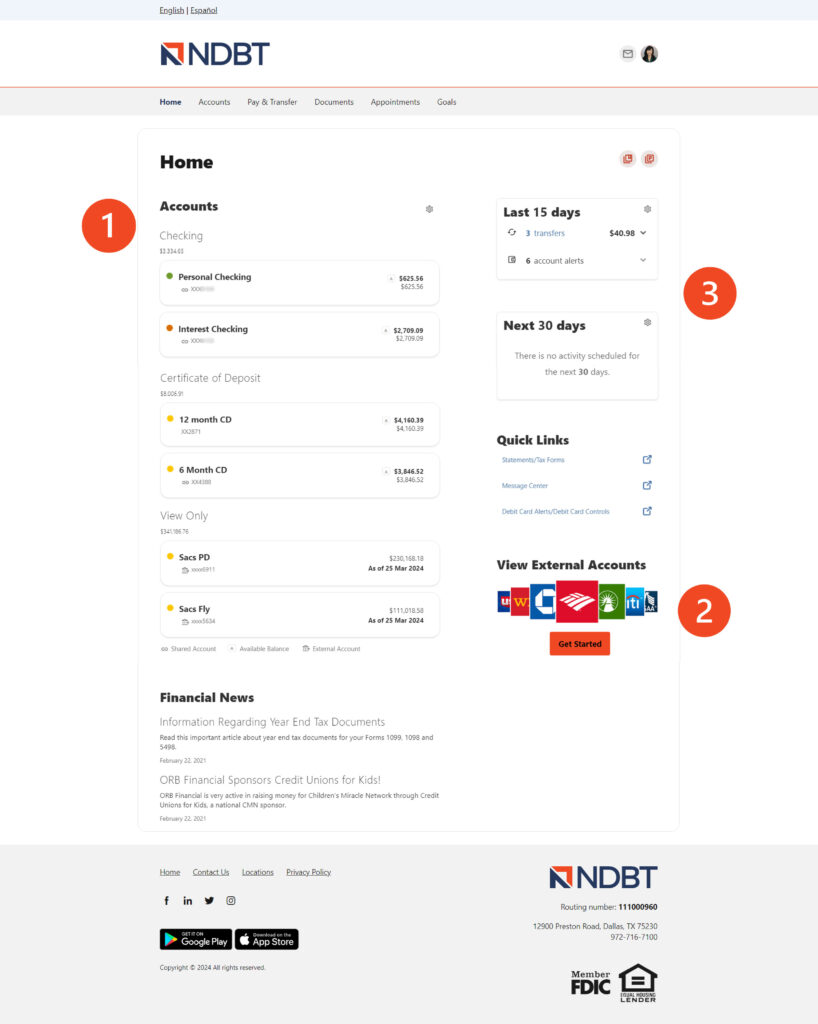
Here is a high-level overview of the summary dashboard from a desktop view.
- Accounts are grouped by Account Type Class (e.g., Checking, Savings, Loans)
- View External Accounts from other Financial Institutions
- Activity Modules provides a quick glance of recent and future activities
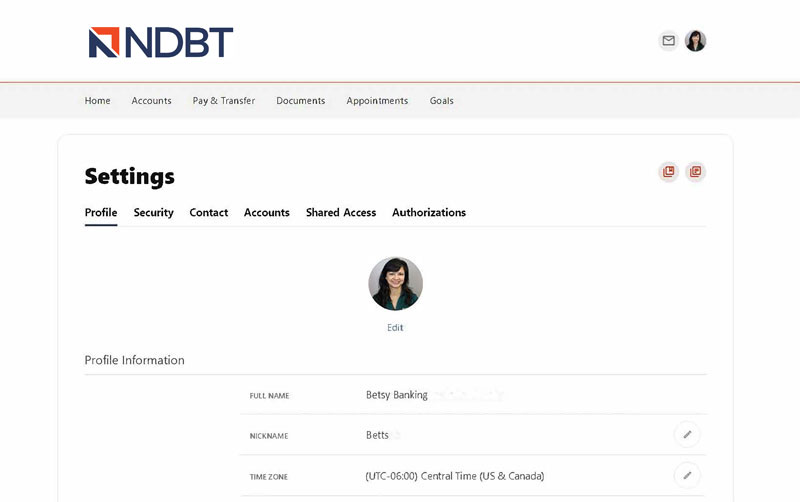
You can navigate to Settings by clicking on the drop-down menu under your name
- Profile: allows you to enter profile information, such as Nickname, Time Zone, profile picture, and view your recent login activity
- Security: allows you to view and edit security details, such as Username, Password, and Two-Factor Authentication, and maintain your authenticated devices
- Contact: allows you to make modifications to contact info, including Address, Phone Numbers, and Email Addresses
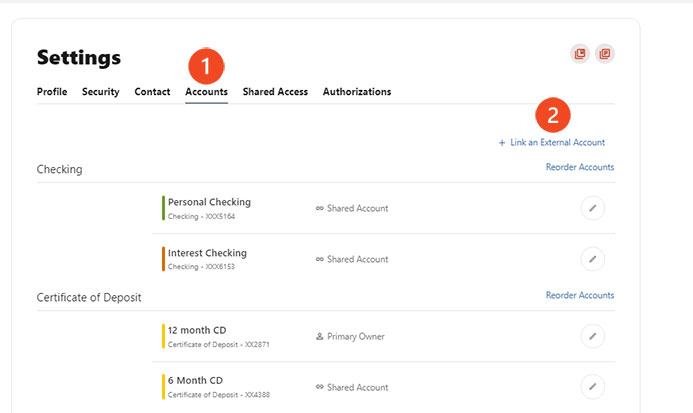
- Accounts: allows you to configure account color and nickname, display order, or hide accounts from display; you can also request access, confirm, or delete external (ACH) accounts
- Shared Access: allows you to share one or many of your accounts with another user and determine their level of view-only access.
- Authorizations: allows you to view and revoke access to authorized devices
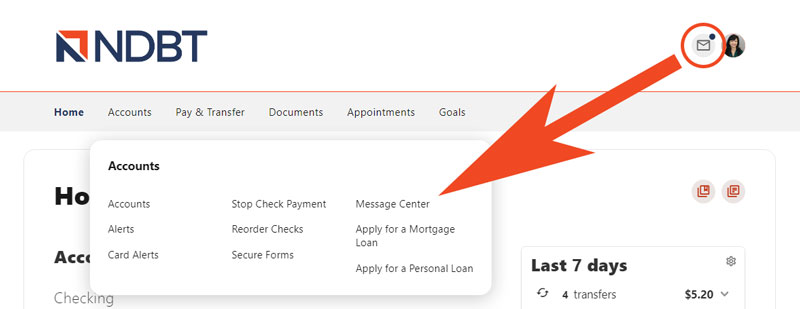
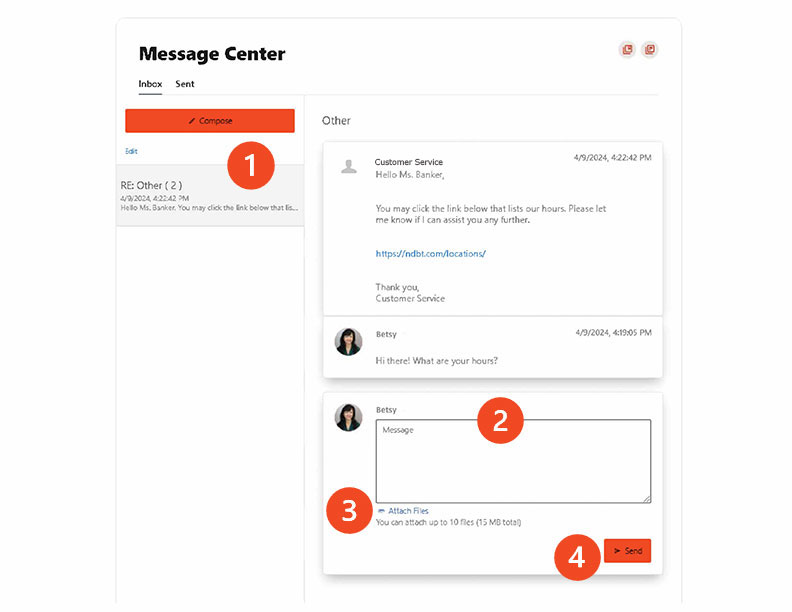
Access the Message Center by clicking the envelope icon by your profile. You will be notified on the icon if you have any unread messages.
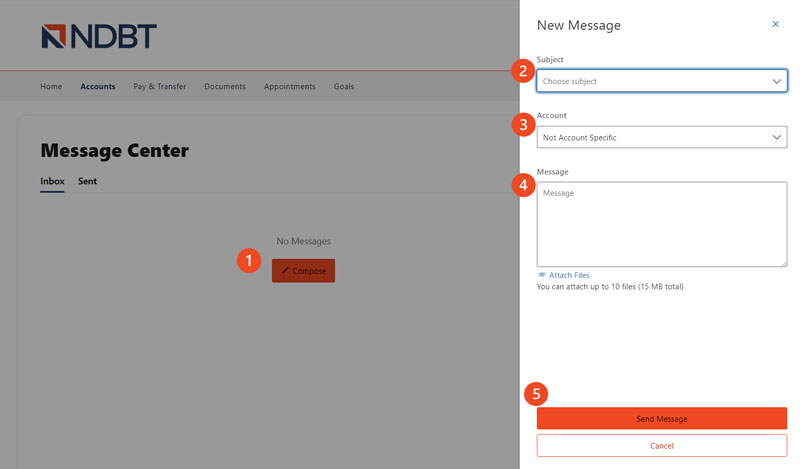
To compose a new message:
- Click the Compose button on the Inbox tab of Message Center.
- Select the message Subject from the dropdown menu.
- Select the Account the message refers to from the dropdown menu.
- Enter the Message body and select the Attach Files link to attach files to the message
- Click the Send Message button to send the message or click the Cancel button to close the New Message window without sending the message.
To respond to a message:
- Select the message thread to respond to. View the messages within the thread.
- Enter a Message response.
- Select the Attach Files link to attach files to the message.
- Click the Send button to send the response.
You have the ability to mark a message thread as unread, read, or delete a message thread.
- Click the Edit link to view the message actions.
- Click the checkbox next to the message threads to act on.
- Click the delete (trash can) button to delete the message threads.
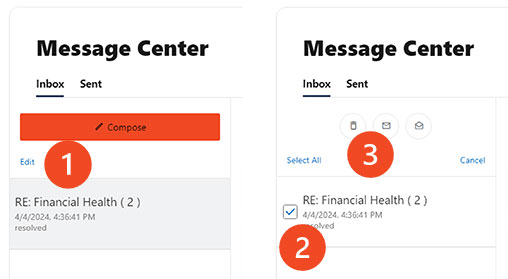
Click the unread (envelope) button to mark the message threads as unread; click the read (open envelope) button to mark the message threads as read.
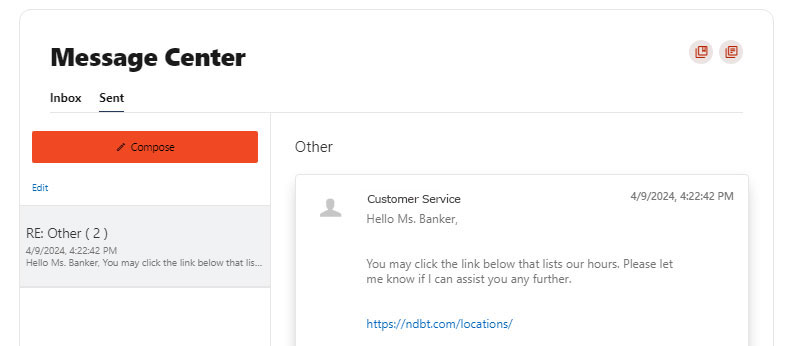
The Sent tab allows you to view and delete messages that have been sent.
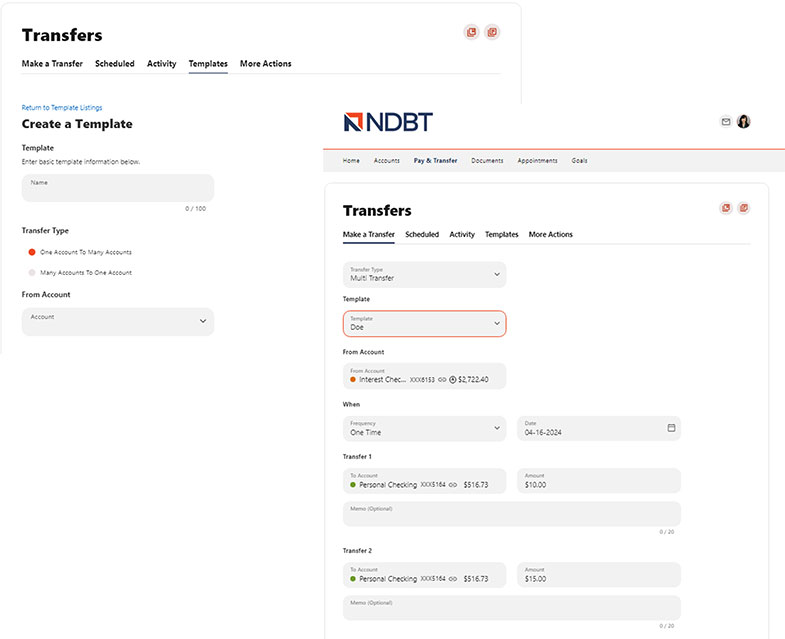
The Make a Transfer tab allows you to perform one-time immediate, scheduled, and recurring transfers as well as loan payments and credit card payments. Transfers can be done with internal and/or external accounts, but at least one of the accounts (to or from) must be an internally held account. In addition, the user can do a single transfer or a multi-transfer from the Templates tab.
- Select the account you want to transfer From.
- Select the account you would like to transfer To.
- Enter the Amount to transfer or select from the list of convenient predetermined accounts.
- Click the Review Transfer button. An Identity Verification may be required to verify your identity, then click the Verify button.
- After reviewing the details of your transfer, select Submit Transfer. A success message will display, confirming your transfer is complete.

Link another user’s account using the following criteria:
Adding an Internal Account
- Select Add An Account from the More Actions dropdown menu.
- A drawer will open asking for the account details you would like to add. Select to send money to another NDBT customer.
- There is a checkbox option to save the account for future use, causing it to show up again in the To dropdown. Or you can leave the box unchecked if it is a one-time transfer.
- You may receive an automated SMS, voice or email with a code to confirm your identity.
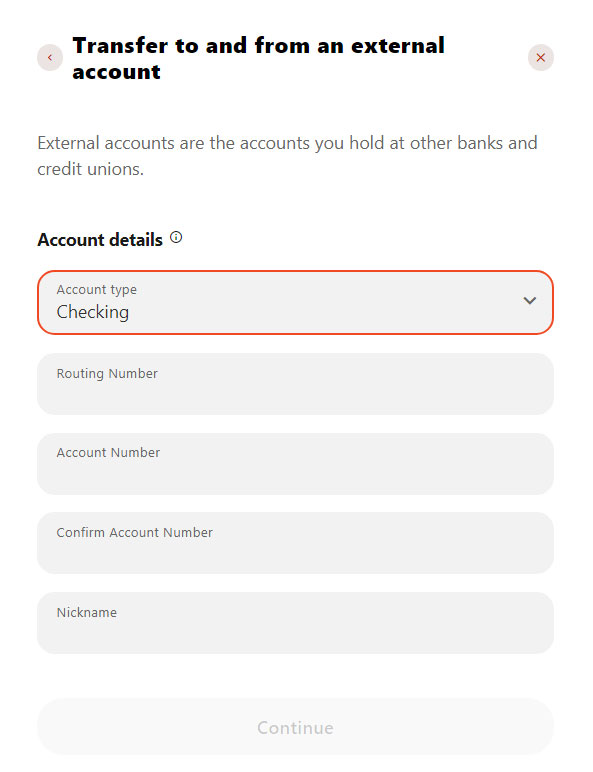
Adding an External Account
- Select Add An Account from either the To or From dropdown menu.
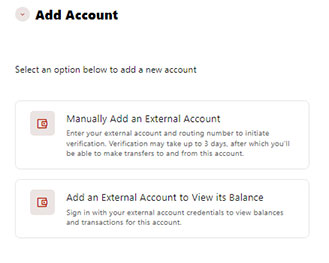
- A drawer will open asking for the type of account you would like to add. Select Instantly Add External Account and be ready to sign in with the credentials you use for that external account. Or you can select Manually Add External Account. With that option, the next screen will allow you to add the details of the external account.
- Once the user has submitted a request to add an external account, the digital banking platform will make two ACH microdeposits (trial deposits) into that account.
- An Actionable Alert will appear at the top of the user’s dashboard to confirm the pending external account. The end user will click Confirm and enter the dollar amounts of the two ACH microdeposits.
- A user has three submission attempts to confirm.
- If unsuccessful after three attempts, the status of the pending external account will change to Suspended.
- Only an NDBT platform admin can change the external account status when suspended.
- After a few days, the account should show within the Accounts widget, however it can take 10-14 days to complete the entire process.
Submitting a Transfer on a Loan
If a loan is chosen for the To account, the various payment options will appear for that loan when you select Payment Type. There can be an option to display due dates for loans to end users if the due date that is synced from the core is the current date or a date in the future.
Memo for Transfers
An optional memo can be added to any transfer. This can be used to enter specific information about the transfer that you may want to record for future reference. This information will be stored and displayed for reference purposes in the Scheduled and Activity tab under the transfer activity.
The Templates tab allows a user to create several transfers From or To a specific account. They will set the transfers up on the Template tab, then they will have the option on the Make a Transfer tab to do a single transfer or a multi-transfer using the template they created.
Adding accounts from other financial institutions makes it convenient for users to view their assets and liabilities in one place. Select the Settings under your profile drop down.
- Select the Accounts tab from Settings.
- Click the Link an External Account button.
Select the Add an External Account to View its Balance option. If it is your first time, you will see an informational screen to guide you through the step-by-step process.
After the platform displays a success message to confirm the external institution was successfully added, it will begin the process of retrieving account details such as name, balance, or type and reading transactions.
You will see your account details and transactions in the Accounts or Home widgets after sixty seconds or less.
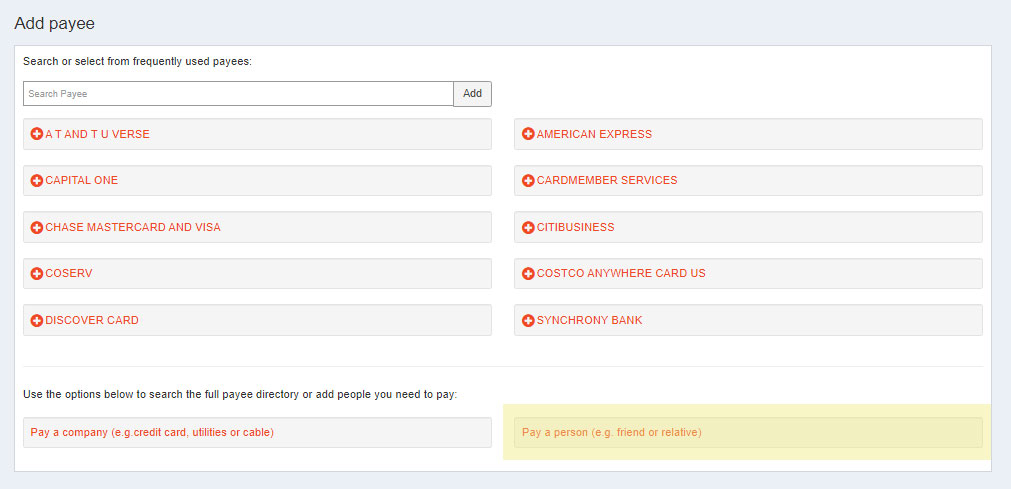
Within BillPay, click the +Payee button. Search or select from frequently used payees. Enter the Payee account number and click Submit. If the company is not found, click Pay a company, then Entering information on billing statement buttons at the bottom of the page. Enter the required fields and click Next.
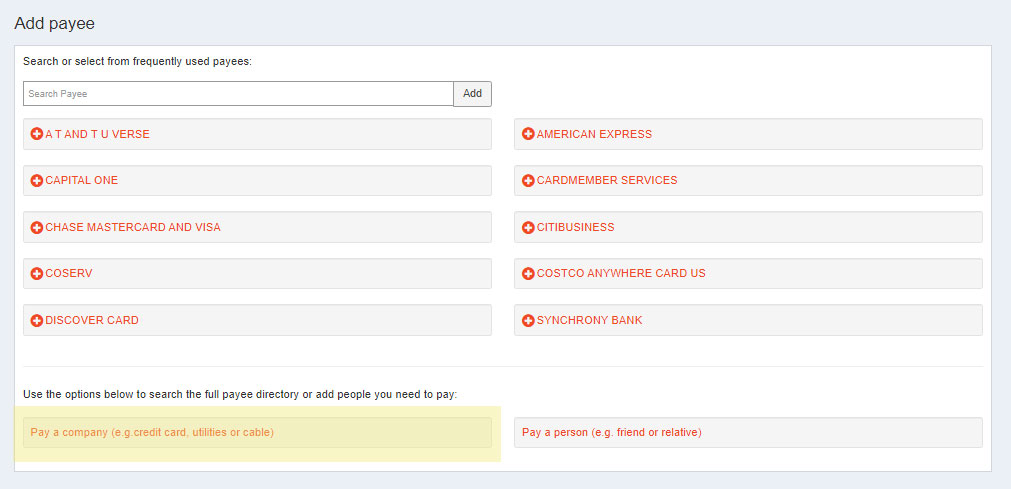
Within BillPay, click the +Payee button. Select the Pay a person button. Choose to send by Email or text message, Direct Deposit, or Check. Complete the required payee fields and click Next. If selecting the Email or text message option, create a keyword, then click Next. Complete the First-time payee activation by selecting the delivery method for activation, entering the activation code, then click Next.
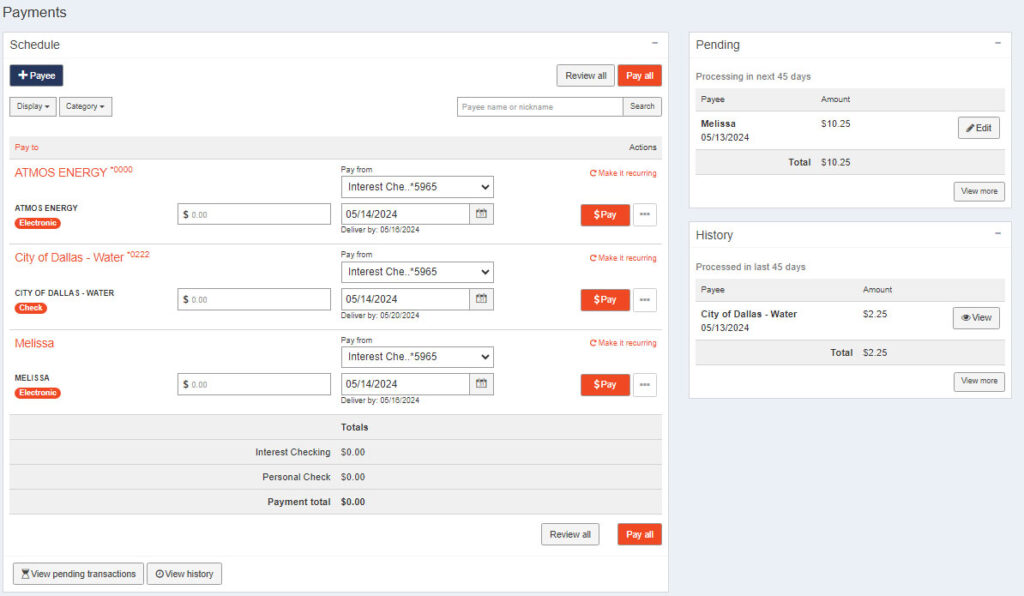
The Payments tab allows you to schedule single and recurring payments to the selected payee. Review and Submit individually or choose to Pay all.
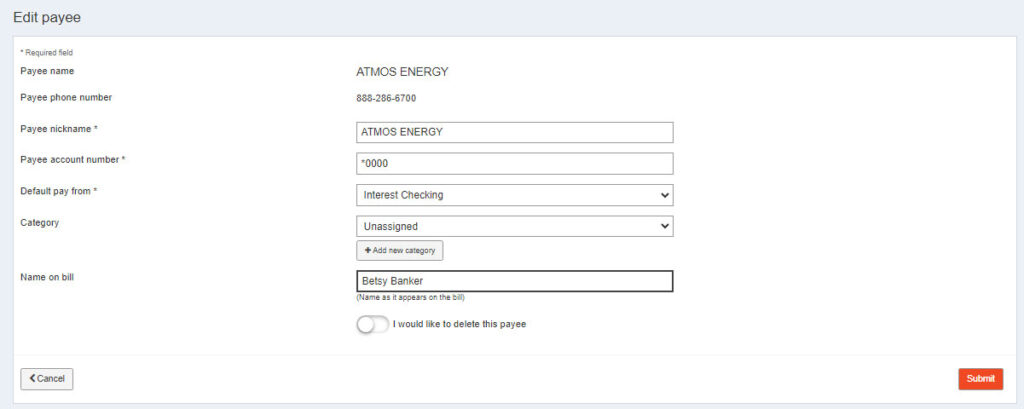
In the Payee details, click Edit payee (pencil icon), amend fields, and click Submit. To Delete a Payee, toggle the I would like to delete this payee button.
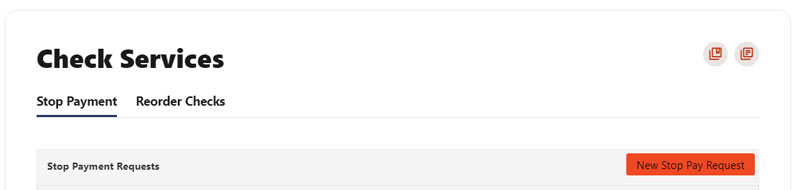
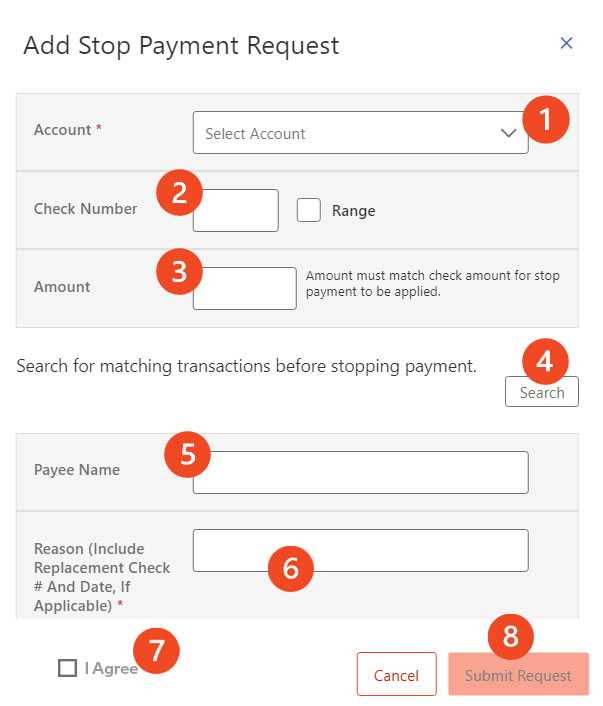
To place a stop payment request:
Click the New Stop Pay Request button, and the Add a Stop Payment Request window will display.
- Click the Account dropdown menu and select the account to place the stop payment on.
- Enter the Check # to place the stop payment on.
- Enter the Amount the check was written for.
- Click the Search button to search for transactions that have cleared the account selected and match the transaction details entered.
- Enter the Payee Name the check was written to.
- Enter the reason for the stop payment. If applicable, enter the replacement check # and date.
- Check the I Agree checkbox to acknowledge the Stop Payment Policy.
- Click the Submit Request button to submit the stop payment request. A message will display indicating the stop payment request was successful. Payment requests that have been placed will display on the Stop Payment tab. Or click the Cancel button to close the Add Stop Payment Request window without submitting the request.
Reorder Checks is used to submit requests for checks.
- Select Reorder Checks within Check Services.
- You will be prompted to select an appropriate account if multiple qualifying accounts are found.
- Enter the check address.
- Enter the shipping address.
- If you have not previously used this feature to reorder checks, you will be prompted to enter the next starting check number for your order.
- Enter the number of boxes.
- Once the information is filled in, select Reorder Checks.